Quilts for Pulse
About a week ago I posted on the TMQG Facebook page that I had a quilt vision that I hoped my fellow guild members would help me realize, and here (finally!) is the tutorial for the blocks that I'm looking for.
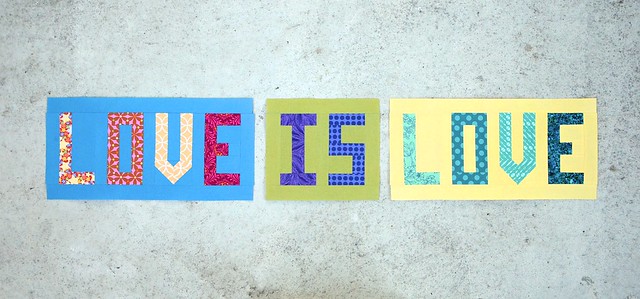
I am asking for LOVE and IS blocks, in bold, bright colours. No black, white, grey, etc. It is also important that the letters be legible, so contrast between the letters and the background is important. You can achieve this in different ways: using a cool background and warm letters (or vice versa) OR using a light background and dark letters (or vice versa). Generally, prints that are on the smaller side, and that don't themselves have a lot of contrast within them, will work best. Make them as scrappy or as solid as you'd like, just keep them bright and cheerful!
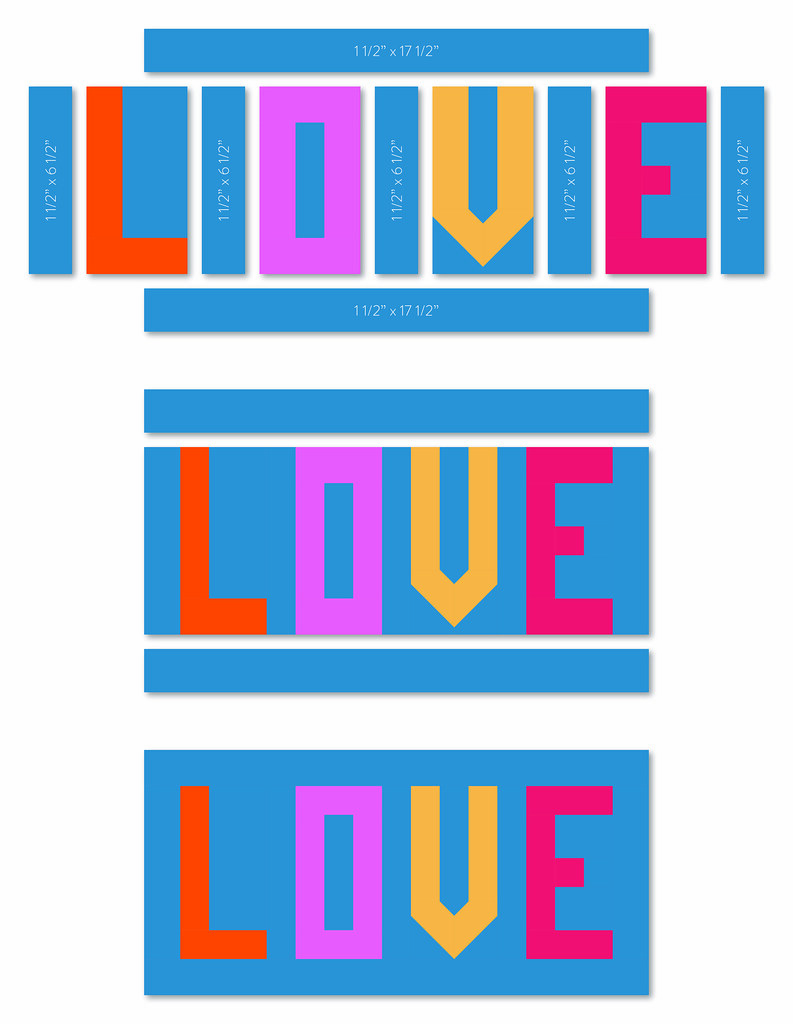
The LOVE block finishes at 8" x 17", so yours will be 8 1/2" x 17 1/2". I would suggest joining the letters together first, without the last 4 border pieces, and then checking your size. At this point you should have a unit that is 6 1/2" x 15 1/2". If you're a little shy, you can always cut those last four strips a bit wider to make up the difference.
The IS block finishes at 8" x 9", so yours will be 8 1/2" x 9 1/2". Just as with the LOVE block, you can check your size at this point: you should have a unit that is 6 1/2" x 7 1/2". Again, if you're a little shy, you can cut the last four strips a bit wider to make up the difference.
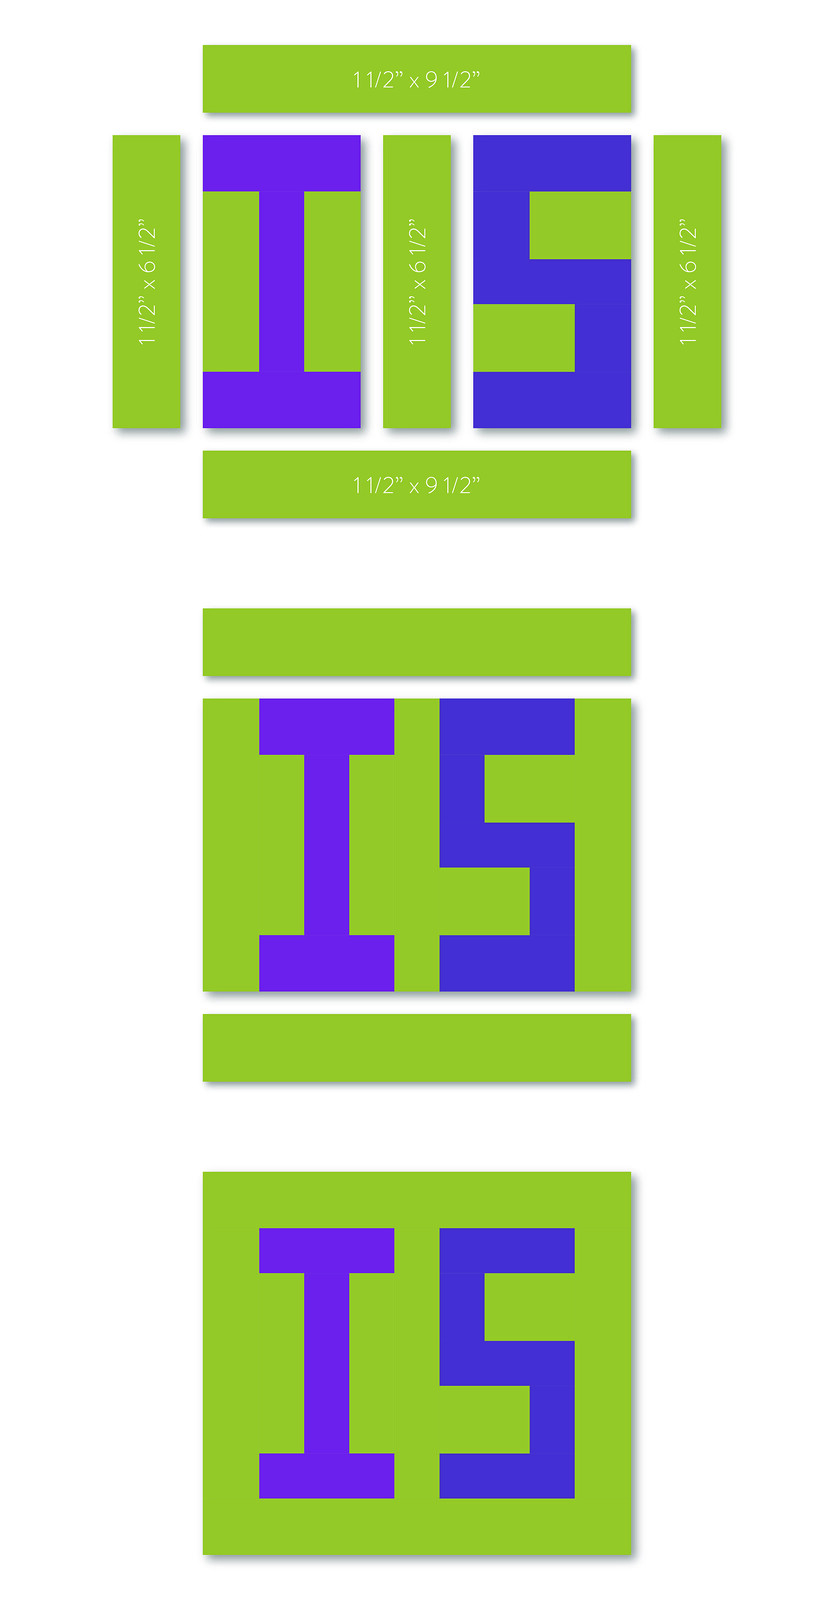
And that's it! I am really looking forward to all the fun colours that everyone chooses. Make as many or as few as you'd like. I'll put them all together, but I would love it if another guild member would be willing to quilt it, since that's the stage where projects stall around my house. :)
Finally, if you want to share your blocks on social media, tag it with #quiltsforpulse, #loveislovequilt and #torontomqg.
See you all on Sunday!
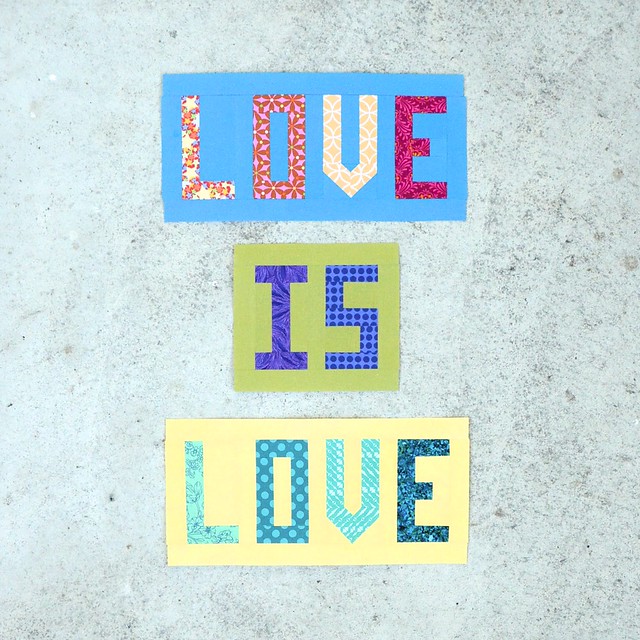
The idea is simple, because the way to accept one another is simple: LOVE. The most shocking thing to me about the hate expressed by the murderer in Orlando on June 12th is that his hate was for how people loved one another. I hope this quilt, this small gesture in a very large world, will join with a million other small gestures to tip the balance on the side of love.

I am asking for LOVE and IS blocks, in bold, bright colours. No black, white, grey, etc. It is also important that the letters be legible, so contrast between the letters and the background is important. You can achieve this in different ways: using a cool background and warm letters (or vice versa) OR using a light background and dark letters (or vice versa). Generally, prints that are on the smaller side, and that don't themselves have a lot of contrast within them, will work best. Make them as scrappy or as solid as you'd like, just keep them bright and cheerful!
Each of the letters "finish" at 3" x 6", so they should be 3 1/2" x 6 1/2" before you join them all together. This is a good place to check your dimensions, since you can cut the 4 final border pieces a bit thicker if necessary if you tend to find your seam allowances are a bit bigger than a scant quarter inch.
I pressed all my seams open, but do what works for you. As long as the blocks are the correct size when you're done, how you got there doesn't matter. :)
Ok, let's get on with it!
LOVE block
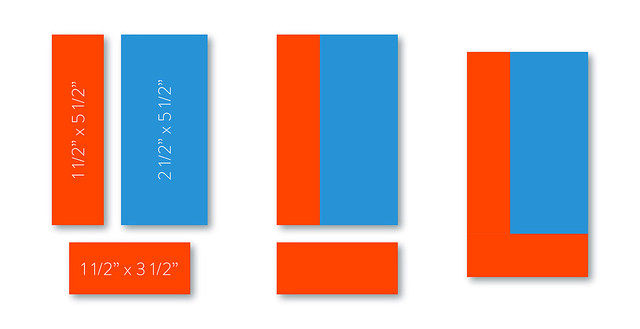
L
Main fabric:
1 - 1 1/2" x 3 1/2"
1 - 1 1/2" x 5 1/2"
Background fabric:
1 - 2 1/2" x 5 1/2"

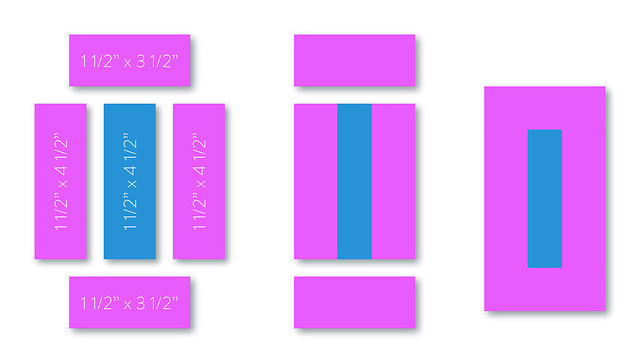
O
Main fabric:
2 - 1 1/2" x 3 1/2"
2 - 1 1/2" x 4 1/2"
Background fabric:
1 - 1 1/2" x 4 1/2"

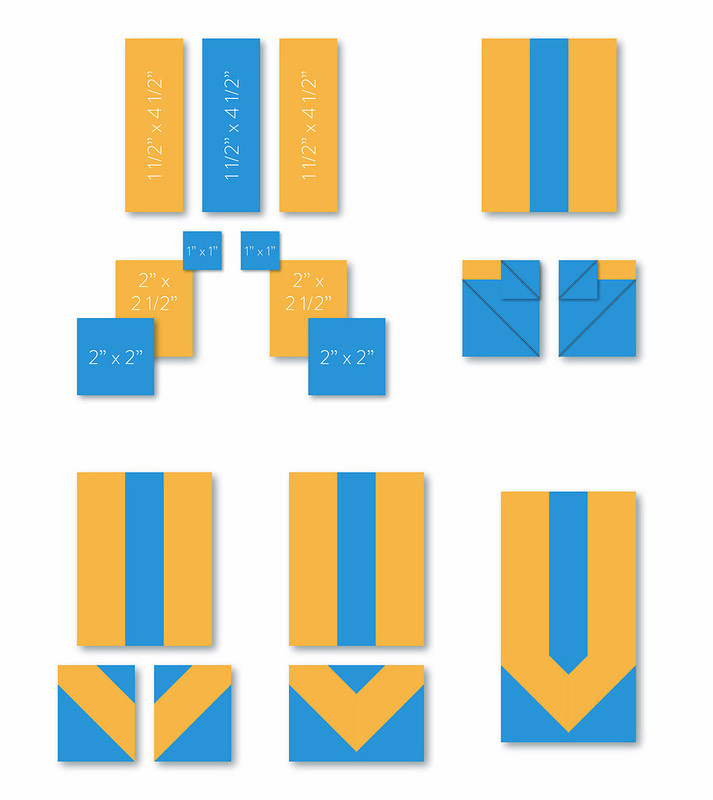
V
Main fabric:
2 - 2" x 2 1/2"
2 - 1 1/2" x 4 1/2"
Background fabric:
1 - 1 1/2" x 4 1/2"
2 - 1" x 1"
2 - 2" x 2"
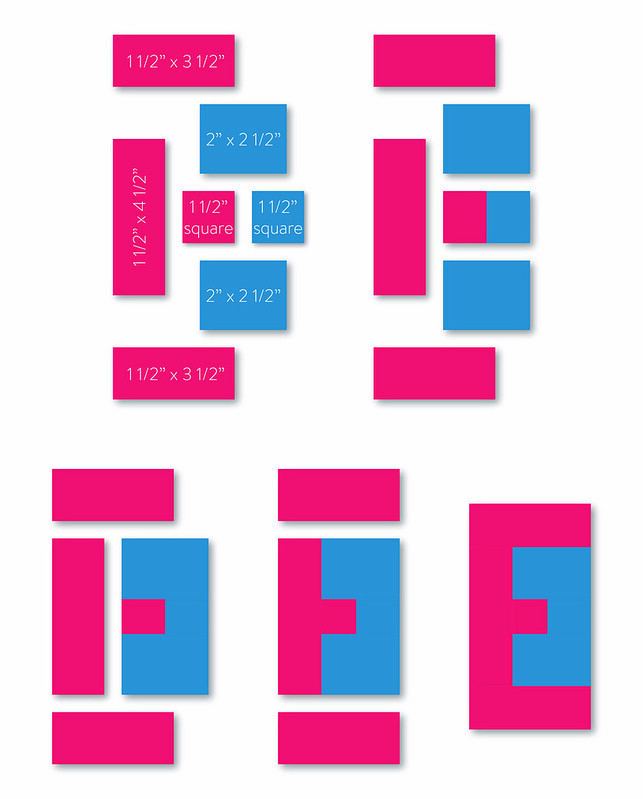
This is the only block that is a bit tricky. Draw chalk lines on the diagonal on the 4 squares of background fabric. Then put them on opposite corners of the main fabric pieces that are 2" x 2 1/2" (right sides together!), with the diagonal lines parallel to each other. You can see this in the second step of the diagram below. Then stitch along those lines, but ever-so-slightly shy of them, so that you end up with a scant seam. You can them trim the excess triangles before you move on to the next step.

E
Main fabric:
2 - 1 1/2" x 3 1/2"
1 - 1 1/2" x 4 1/2"
1 - 1 1/2" x 1 1/2"
Background fabric:
1 - 1 1/2" x 1 1/2"
2 - 2" x 2 1/2"

Putting it together
Background fabric:
5 - 1 1/2" x 6 1/2"
2 - 1 1/2" x 17 1/2"The LOVE block finishes at 8" x 17", so yours will be 8 1/2" x 17 1/2". I would suggest joining the letters together first, without the last 4 border pieces, and then checking your size. At this point you should have a unit that is 6 1/2" x 15 1/2". If you're a little shy, you can always cut those last four strips a bit wider to make up the difference.

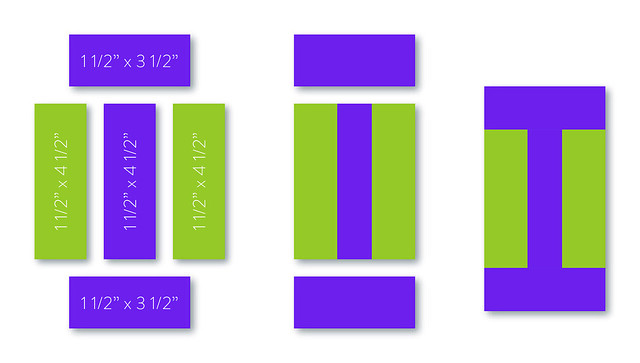
IS block
I
Main fabric:
2 - 1 1/2" x 3 1/2"
1 - 1 1/2" x 4 1/2"
Background fabric:
2 - 1 1/2" x 4 1/2"

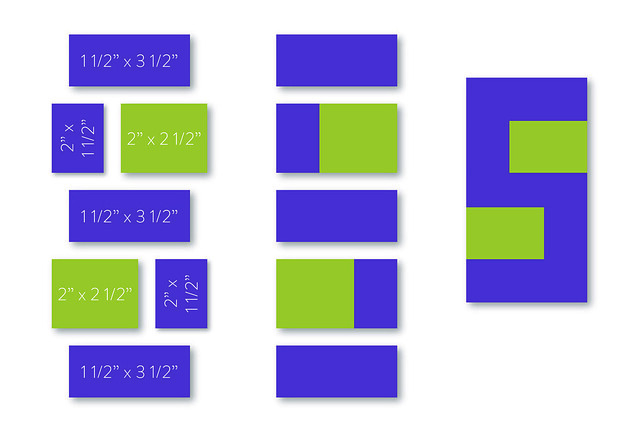
S
Main fabric:
3 - 1 1/2" x 3 1/2"
2 - 2" x 1 1/2"
Background fabric:
2 - 2" x 2 1/2"

Putting it together
Background fabric:
3 - 1 1/2" x 6 1/2"
2 - 1 1/2" x 9 1/2"The IS block finishes at 8" x 9", so yours will be 8 1/2" x 9 1/2". Just as with the LOVE block, you can check your size at this point: you should have a unit that is 6 1/2" x 7 1/2". Again, if you're a little shy, you can cut the last four strips a bit wider to make up the difference.

And that's it! I am really looking forward to all the fun colours that everyone chooses. Make as many or as few as you'd like. I'll put them all together, but I would love it if another guild member would be willing to quilt it, since that's the stage where projects stall around my house. :)
Finally, if you want to share your blocks on social media, tag it with #quiltsforpulse, #loveislovequilt and #torontomqg.
See you all on Sunday!


Comments
Post a Comment